I’m using this post as a way to write down all of the ideas of how to implement our accelerometer informed adaptive sample rate magnetometer with Goertzel’s analysis. Or, how about we call it Meltycompass.
This post was published early in service of a review. While the majority of it is solid, there is still an unidentified flaw preventing correct operation. You’ve been warned.
You can find the source code associated with this post here.
We’re going to do everything in our power to reduce our computational load, but we’re still running on an RP2040. With a relatively low clock rate and no hardware floating point, we can easily max it out.
But the RP2040 does have the benefit of a second core, which until now has been completely unused. We will dedicate this second core to running our heading sensor.
Our overall plan of attack is pictured below.
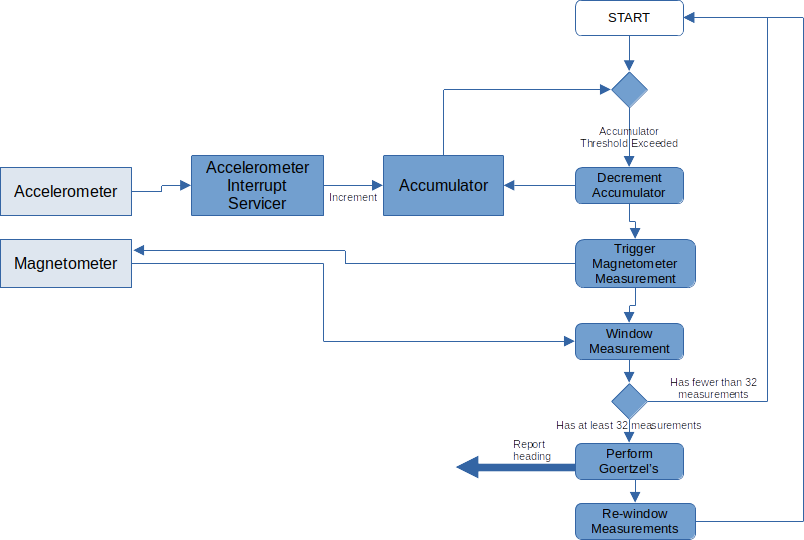
Planned software block diagram
Accelerometer Handling
The H3LIS331DL can be configured to self-trigger at 1000Hz and toggle a pin every time a new measurement is ready. So we will use a GPIO interrupt to read our data.
void accelInterrupt(uint gpio, uint32_t events) {
    headingSensor.serviceAccelInterrupt();
    gpio_acknowledge_irq(gpio, events);
}

void core1_main() {
    gpio_init(GPIO_ACCEL_INT);
    gpio_set_dir(GPIO_ACCEL_INT, false);

    gpio_set_irq_enabled_with_callback(GPIO_ACCEL_INT, GPIO_IRQ_EDGE_RISE, true, accelInterrupt);
The SPI protocol is handled by the PIO rather than the hard SPI peripheral. After attempting use, I realized the RP2040’s hard SPI peripheral isn’t that great. The interrupt support is poor, and it can’t hold CSn low across words. I started with the example SPI PIO program, and modified the CSn timings slightly.
.program spi_cpha0_cs
.side_set 2

.wrap_target
bitloop:
    out pins, 1        side 0x0 [1]
    in pins, 1         side 0x1
    jmp x-- bitloop    side 0x1

    out pins, 1        side 0x0
    mov x, y           side 0x0     ; Reload bit counter from Y
    in pins, 1         side 0x1
    jmp !osre bitloop  side 0x1     ; Fall-through if TXF empties

    nop                side 0x1 [1] ; CSn back porch
public entry_point:                 ; Must set X,Y to n-2 before starting!
    pull ifempty       side 0x3 [1] ; Block with CSn high (minimum 2 cycles)
                                    ; Note ifempty to avoid time-of-check race
    nop                side 0x1 [1] ; Drop CSn before SCK
.wrap
Accumulator: Timing Our Magnetometer Measurements
The maximum sample rate of our magnetometer is 300Hz. We can always sample slower, but not faster, so this max speed must occur at the top of our signal frequency range. Signal frequency is the same as our rotation speed, so basically we need to pick a top speed. At that top speed, we sample the magnetometer at maximum.
For our robots, we are generally around 1300RPM. So lets pick 1500RPM as our max. That corresponds to 25Hz. So when we are spinning at 25Hz, we need to sample at 300Hz.
The way to handle this with the least overhead is a simple accumulator. When we get an accelerometer measurement, add it to a variable (the accumulator). When the accumulator reaches a threshold, subtract the threshold from it and trigger a measurement. Set up this way, if we spin half as fast, the accumulator gains value half as fast. So our magnetometer will trigger half as fast. Exactly the behavior we want.
Now, this assumes that the response from the accelerometer is linear. But that isn’t true by default, because centripetal acceleration has a square relationship with rotation speed.
$$ a_c = r\omega^2 $$
So to correct this, we will need to use the square root of our measurement.
$$\omega = \sqrt{\frac{a_\textrm{meas}}{r}}$$
Additionally, we will need to convert from raw accelerometer LSBs to acceleration.
$$a(x)=\frac{\textrm{Sample}(x)\times9.8G_\textrm{max}}{2^{\textrm{bits}-1}}$$
Putting this all together:
$$\omega(x) = \sqrt{\frac{9.8G_\textrm{max}}{r2^{\textrm{bits}-1}}} \sqrt{\textrm{Sample(x)}}$$
Another way to look at this is we use the accelerometer to ensure that exactly the same rotational distance is covered between every magnetometer sample. We can calculate what that distance is using known constants.
$$\theta = \frac{\omega_{\textrm{max}}}{f_\textrm{mag max}}$$
Bringing back math from previous blog posts, we can also calculate how far we’ve traveled by integrating our speed as measured by the accelerometer.
$$\theta = \int_0^{T_\textrm{mag}}\omega(t)dt$$
Since we have rotational speed in the form of discrete measurements, we must replace our continuous integral with an approximation. We will use triangular approximation.
$$\theta = \int_{0}^{T_\textrm{mag}}\omega(t)dt \approx \sum_{i=1}^{n}\frac{\omega(i)+\omega(i-1)}{2}T_\textrm{accel}$$
This approximation will of course introduce error. But unlike accelerometer-only algorithms, the error is only relevant to a single magnetometer measurement and “resets” afterwards. So it has much less time to build up. Lets bring our equations together.
$$\frac{\omega_{\textrm{max}}}{f_\textrm{mag max}} \approx \sum_{i=1}^{n}\frac{\omega(i)+\omega(i-1)}{2}T_\textrm{accel}$$
The left side of that equation is precomputed, and the contents of the sum must be calculated for every accelerometer sample. So any math that can be moved to the left side makes our code faster.
$$\frac{2f_\textrm{accel}\omega_{\textrm{max}}}{f_\textrm{mag max}} \approx \sum_{i=1}^{n}\omega(i)+\omega(i-1)$$
Now we pull in our conversion from LSBs to $\omega$.
$$\frac{2f_\textrm{accel}\omega_{\textrm{max}}}{f_\textrm{mag max}} \approx \sqrt{\frac{9.8G_{max}}{2^{\textrm{bits}-1}r}} \sum_{i=1}^{n} \sqrt{\textrm{Sample}(i)}+\sqrt{\textrm{Sample}(i-1)}$$
And finally:
$$\frac{4\pi f_\textrm{accel}f_{\textrm{bot max}}}{f_\textrm{mag max}} \sqrt{\frac{2^{\textrm{bits}-1}r}{9.8G_{max}}} \approx \sum_{i=1}^{n} \sqrt{\textrm{Sample}(i)}+\sqrt{\textrm{Sample}(i-1)}$$
The final equation compares a sum of accelerometer measurements to a fixed threshold. When the sum and threshold match, it is time to take a magnetometer measurement.
Timing between accelerometer samples
If we rely only on accelerometer measurements, at best we could trigger our magnetometer measurements with a precision of 1ms. To do better, we will perform a linear extrapolation from the previous two samples.
We will accept some error for a simplification, and assume that the average acceleration between the previous two points is constant.
Starting from an earlier equation, we add an extra term to make the equality exact.
$$\frac{\omega_{\textrm{max}}}{f_\textrm{mag max}} = \sum_{i=1}^{n}\frac{\omega(i)+\omega(i-1)}{2}T_\textrm{accel} + \frac{\omega_\textrm{Predicted}+\omega(i)}{2}t$$
Where “t” is the duration of our extra partial period. Simplify down a bit:
$$\frac{ 2 f_\textrm{accel} \omega_\textrm{max} } {f_\textrm{mag max}} = \sum_{i=1}^{n}(\omega(i)+\omega(i-1)) + (\omega_\textrm{Predicted} + \omega(i)) \frac{t}{ T_\textrm{accel} }$$
We convert from $\omega$ to samples:
$$\frac{4\pi f_\textrm{accel}f_{\textrm{bot max}}}{f_\textrm{mag max}}\sqrt{\frac{2^{\textrm{bits}-1}r}{9.8G_{max}}} = \sum_{i=1}^{n}( \sqrt{\textrm{Sample}(i)}+\sqrt{\textrm{Sample}(i-1)})$$ $$ + (\sqrt{\textrm{Sample}(\textrm{predicted})} + \sqrt{\textrm{Sample}(i)})\frac{t}{T_\textrm{accel}}$$
The equation is starting to get out of hand, so lets redefine it in this form:
$$\textrm{Threshold} = \textrm{Accumulation} + \textrm{Prediction}$$ $$\textrm{Threshold} = \frac{4\pi f_\textrm{accel}f_{\textrm{bot max}}}{f_\textrm{mag max}}\sqrt{\frac{2^{\textrm{bits}-1}r}{9.8G_{max}}}$$ $$\textrm{Accumulation} = \sum_{i=1}^{n}( \sqrt{\textrm{Sample}(i)}+\sqrt{\textrm{Sample}(i-1)})$$
"Threshold" is composed of known constants only, so it can and should be precomputed. "Accumulation" is composed entirely of real accelerometer data. It should be incremented by the accelerometer interrupt, and be zeroed (actually, "Threshold" should be subtracted from it) after a magnetometer sample is taken. Now we have to finish deriving our "Prediction" term.
We assume a fixed slope for $\sqrt{\textrm{Sample}(x)}$, which we can find by:
$$m = \frac{\sqrt{\textrm{Sample}(i)} - \sqrt{\textrm{Sample}(i-1)}}{T_\textrm{accel}}$$
Given a fixed slope, our predicted sample takes the form of $y=mx+b$.
$$\textrm{Predicted Val} = \frac{\sqrt{\textrm{Sample}(i)} - \sqrt{\textrm{Sample}(i-1)}}{T_\textrm{accel}} t + \sqrt{\textrm{Sample}(i)}$$
Lets put this all together.
$$\textrm{Prediction} = \frac{ \frac{\sqrt{\textrm{Sample}(i)} - \sqrt{\textrm{Sample}(i-1)}}{T_\textrm{accel}} t + 2\sqrt{\textrm{Sample}(i)} }{T_\textrm{accel}} t$$
We pre-calculate most of the values we need in the accelerometer interrupt.
void MeltyCompass::serviceAccelInterrupt() {
    //Spin mode: update the accumulator and extrapolation values
    if(mEnable) {
        mLastAccelSampleTime = time_us_32();
        uint32_t accelSample = (uint32_t) (mAccel->getSample());
        accelSample = squareRootRounded(accelSample);
        mAccelAccumulator += accelSample + mLastAccelSample;
        mAccumulatorRise = accelSample - mLastAccelSample;
        mLastAccelSample = accelSample;

    //Non-spin mode: get the current orientation
    } else {
        int16_t accelSample = mAccel->getSample() + 11;
        mOrientation = accelSample > 0;
    }
}
And here is the loop where we wait to trigger our magnetometer measurement.
while(mEnable) {
    uint32_t extraTime = time_us_32()-mLastAccelSampleTime;
    uint32_t predictedAccumulation =
        (2*mLastAccelSample + (mAccumulatorRise*extraTime)/ACCEL_SAMPLE_PERIOD)
        * extraTime / ACCEL_SAMPLE_PERIOD;

    if(mAccelAccumulator + predictedAccumulation >= ACCUMULATION_THRESH) {
        //We subtract the threshold from the accumulator later
        //while we update with the new heading value
        break;
    }
}
Goertzel Coefficients
Normally when using Goertzel’s, you will calculate Goertzel coefficients to match your sampled data. For our use, that is flipped. We will be warping our data to match pre-chosen Goertzel coefficients. So our coefficients are based off of the setpoint of our warping strategy, which is 25Hz target and 300Hz sample.
$$k=\textrm{floor}(0.5 + \frac{Nf_\textrm{target}}{f_\textrm{sample}})$$ $$w=\frac{2\pi k}{N}$$ $$\textrm{cosW}=\cos(w)$$ $$\textrm{sinW}=\sin(w)$$ $$\textrm{coeff}=2\textrm{cosW}$$ Our values: $f_\textrm{target}=25$, $f_\textrm{sample}=300$, N=32. $$k=\textrm{floor}(0.5 + \frac{32\cdot25}{300})=3$$ $$w=\frac{2\pi 3}{32}=0.589$$ $$\textrm{cosW}=\cos(0.589)=0.8314$$ $$\textrm{sinW}=\sin(0.589)=0.5556$$ $$\textrm{coeff}=2\cdot 0.8314=1.6628$$
That said, as noted in the accumulator threshold section, a rough tune may result in a k that doesn’t match up with your expectations. If you find the algorithm doesn’t work, it is recommended to retrieve a couple windows of data from the robot and run FFT’s of them. This allows you to verify your coefficient settings, because the bin number of the top of the first peak is the correct k.
Windowing
Goertzel’s algorithm is an FFT at heart, so it benefits from windowing. I wont dig into the details here, beyond that it’s a function you can apply to your data before your FFT to reduce a specific kind of artifact in the result.
Simulation showed that windowing our data improved our heading error enough to justify the compute expense. However, a different implementation of this system may choose to forgo windowing.
You simply multiply each data point by a pre-computed coefficient. You can calculate your coefficients like so:
$$\textrm{Window Coeff i} = 0.54 - 0.46\cos(2\pi\frac{i}{N})$$ Where i is the sample index, and N is the total number of samples. $$\textrm{data_w(i)} = \textrm{data(i)}\cdot\textrm{w_coeff(i)}$$
You may notice in the block diagram at the top that we window data in two places. This is an attempt to minimize latency between getting a new magnetometer sample and presenting an updated heading.
Immediately after finishing a Goertzel’s iteration, we re-window the newest N-1 samples. This way when we get our next sample, we only have to window that one sample before we start the next Goertzel’s.
Math Speed Requirements
I’ve been light on showing code for our math so far, and that’s because it’s a whole thing. The RP2040 doesn’t have a floating point unit, remember. It does have soft floating point functions built into a ROM, which is nice. But even they are pretty slow. To put numbers to this, if we want to support 300Hz operation, our loop must finish in $\frac{1}{300}=3.333\textrm{ms}$. According to table 3 in the raspberry pi SDK guide, that’s enough time for 51 floating point multiply operations. Considering just multiplies, the window function and the Goertzel’s require 66. So clearly we can’t use entirely floating point.
Fixed Point
We can instead use fixed point, which is comparable in speed to standard integer operations. Fixed point can even be more precise than floating point in many cases, but it comes with the tradeoff of having to manage our scaling factor.
Lets demonstrate with an example, say we want to multiply 1.27 by 5.
We can choose to represent 1.27 with a scaling factor of 100, which turns it into 127. Now we can do a simple integer multiply, $127\cdot5=635$, with an implicit scaling factor of 100. We can choose to round that to 6 or keep it for further calculations.
We can multiply two decimal number together this way. $1.27\cdot1.35$ becomes $127\cdot135=17145$. When you multiply two scaled numbers together, the scaling also multiplies. So the result has a scaling factor of 10000, making our answer 1.7145.
On a computer, it’s best to use a scaling factor that is a power of 2. That’s because multiplying and dividing by powers of 2 is incredibly cheap.
The other practical consideration to consider is that we need to be careful not to overflow our number. If we multiply two numbers with $2^{20}$ scaling factors, the result will have a $2^{40}$ scaling. This will probably overflow a 32bit sized variable, which could screw up our math. But if the scaling factor is too small, we wont have enough useful precision. It’s a constant tradeoff
MeltyCompass, Step-By-Step
Fixed point requires careful consideration of precision and size at every step. So I’m going to have to go through the math in more detail than I normally would.
Input Data: Magnetometer Samples
The BMM150 X and Y axis have a precision of 13 bits, and a resolution of 0.3uT per LSB. We expect a maximum of 50µT of earth field, plus between 10.84µT and 225000µT of field depending on the distance to the motor magnets. As an aside, the magnetometer clips at 1300µT, so that imposes a limit how close we can be to the motor. We will limit it to 1000µT, which is 13.5mm away from our motor magnets. These numbers are relevant to the motors in our 1lb and 3lb robots, and so should be re-considered for other robots.
What’s Important to our fixed point considerations is the 50µT earth field, which corresponds to 166LSBs. From simulation, I know that Goertzel’s can operate on as few as +/-5 LSBs. So it’s reasonable to drop our resolution from 13 bits to as low as 10 if needed. But in the end the three bits didn’t make or break anything, so I kept them.
int32_t sample = (int32_t) (mMag->getReading());
mSampleBuf[mSampleIndex] = sample;
mSampleIndex = (mSampleIndex+1) % SAMPLE_WINDOW_SIZE;
The samples are kept in a circular buffer, so we don’t have to spend time manually shifting old data every sample.
Windowing
After getting the sample, the next operation is a multiply with our pre-computed windowing coefficient. From simulation I confirmed that as few as 8 bits of precision are enough for windowing to work correctly, so I will use that here.
$$\textrm{Window Coeff i} = 0.54 - 0.46\cos(\frac{2\pi}{N} i)$$ $$\textrm{FP Window Coeff i} = \textrm{int}(0.5 + (\textrm{Window Coeff i})2^\textrm{bits})$$
Where, reminder, N=32 and bits=8. These coefficients should definitely be pre-computed. They can be applied to your raw data like so:
windowData[i] = rawData[i] * windowCoeff[i];The result will have 8 bits of precision, meaning it’s still multiplied by $2^8$. We will maintain this precision into the following section.
Fixed-point Goertzel’s Algorithm
int64_t d1 = 0;
int64_t d2 = 0;
for(uint8_t i=0; i<SAMPLE_WINDOW_SIZE; i++) {
  int64_t coeffd1 = (GOERTZEL_COEFF*d1) >> FIXED_PRECISION;
  int64_t y = mWindowedBuf[i] + coeffd1 - d2;

  d2 = d1;
  d1 = y;
}
int64_t resultR = d1 - ((d2*GOERTZEL_COSW) >> FIXED_PRECISION);
int64_t resultI = (d2*GOERTZEL_SINW);//This result has 2X precision!

//RP2040 hard-ROM float functions
float resultR_f = fix642float(resultR, FIXED_PRECISION);
float resultI_f = fix642float(resultI, FIXED_PRECISION*2);
//We choose not to compute signal magnitude
float phase = atan2f(resultI_f, resultR_f);
int32_t phaseFixed = float2fix(phase, 16);
int16_t heading = (int16_t) ((180 * phaseFixed) / PI_FP16);
if(heading < 0) heading += 360;

mutex_enter_blocking(&mHeadingMutex);
mAccelAccumulator -= ACCUMULATION_THRESH;
mAbsoluteHeading = heading;
mutex_exit(&mHeadingMutex);
mHeadingValid = true;
Additions and subtractions must occur between two numbers of the same precision, so you can see me shifting out extra precision in a couple places.
Re-Window Old Data
Now that we’ve delivered out result, we can start looking forward to the next cycle. The main thing we can do ahead of time is re-windowing our sample buffer, now with each sample shifted a position. This lowers the latency from sample to result, which is generally a good thing for us.
for(uint8_t i=0; i<SAMPLE_WINDOW_SIZE-1; i++) {
  uint8_t bufIndex = (mSampleIndex+i) % SAMPLE_WINDOW_SIZE;
  mWindowedBuf[i] = mSampleBuf[bufIndex]*mWindowCoeffs[i];
}
Using the Result
It’s not enough to use the Goertzel result alone, because we will only get a new result every 30°. To reach single-degree precision, we will have to supplement with accelerometer data.
Fortunately, the accumulator corresponds with how far we have rotated since the last magnetometer fix. We can even use the same extrapolation math to reach maximum precision.
//This is intended to be run by core0
int16_t MeltyCompass::getHeading() {
    uint32_t predictedAccumulation =
        (mAccumulatorRise*(time_us_32()-mLastAccelSampleTime)) /
        ACCEL_SAMPLE_PERIOD;

    mutex_enter_blocking(&mHeadingMutex);
    uint32_t totalAccumulation = mAccelAccumulator + predictedAccumulation;
    int16_t heading = mAbsoluteHeading;
    mutex_exit(&mHeadingMutex);
    int16_t predictedHeading = (DEG_PER_THRESH * totalAccumulation) / ACCUMULATION_THRESH;
    return heading + predictedHeading;
}
This function gets run by core0 on demand. Since we have two cores operating on the same data, a mutex is employed. This prevents the cores from stepping on each other, as otherwise core1 may overwrite this data at the same time core0 is trying to read it.